
I’m a huge fan of infrared saunas, and have previously written about the benefits I’ve experienced from using them. I recently hacked together my own DIY near infrared sauna for home/personal use, and it was so easy and affordable that I wanted to share!
Full Spectrum, Far Infrared, Near Infrared… What’s the Difference?
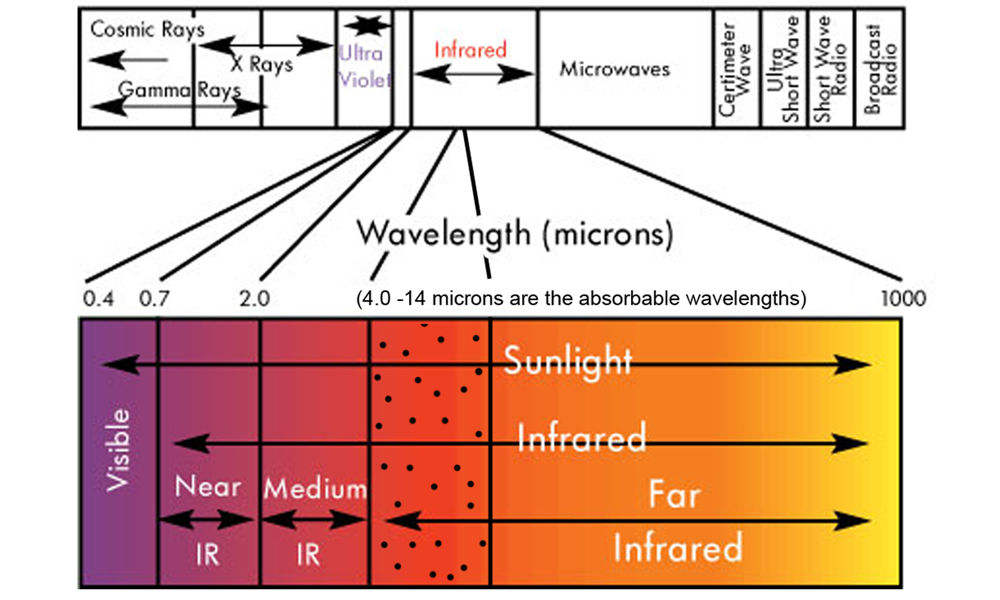
Infrared saunas come in several varieties, with the main difference among them being the wavelengths they produce, which in turn affect the depth of tissue they can penetrate. They all provide detox and fat burning benefits:
- Near infrared saunas: Near infrared (NIR) penetrates deepest into the body. It’s a bit of a combination of heat therapy and light therapy. NIR is great for detox, boosting the immune system, and wound healing.
- Far infrared saunas: FIR saunas using heating elements to emit their (invisible) light and do not penetrate as deeply as NIR. They provide detox and relaxation benefits, and have been shown to aid in lowering blood pressure.
- Full spectrum: Emit near, mid and far wavelengths independently, and each can be adjusted independently for desired benefits.
I am a big fan of low-EMF, full spectrum IR saunas, and if you have the space and the financial resources, I highly recommend going with one of those units. There are also some very nice consumer-grade near infrared models available from brands like Clearlight, Sunlighten, and SaunaSpace (I’ve included links at the end of this post). But if price is an issue or (in my case) you simply don’t have the space to install one of the larger free-standing models in your home you can assemble a “pretty good” DIY sauna.
Warning: There are many “cheap” infrared saunas being sold on eBay and import sites like AliExpress. The two main risks they pose are a) electromagnetic fields (EMF) they throw off, and b) volatile organic compounds (VOCs) that cheap materials will off gas (and you will, in turn, inhale), made even worse by the sauna’s heat.
What You’ll Need to Build a DIY Near Infrared Sauna
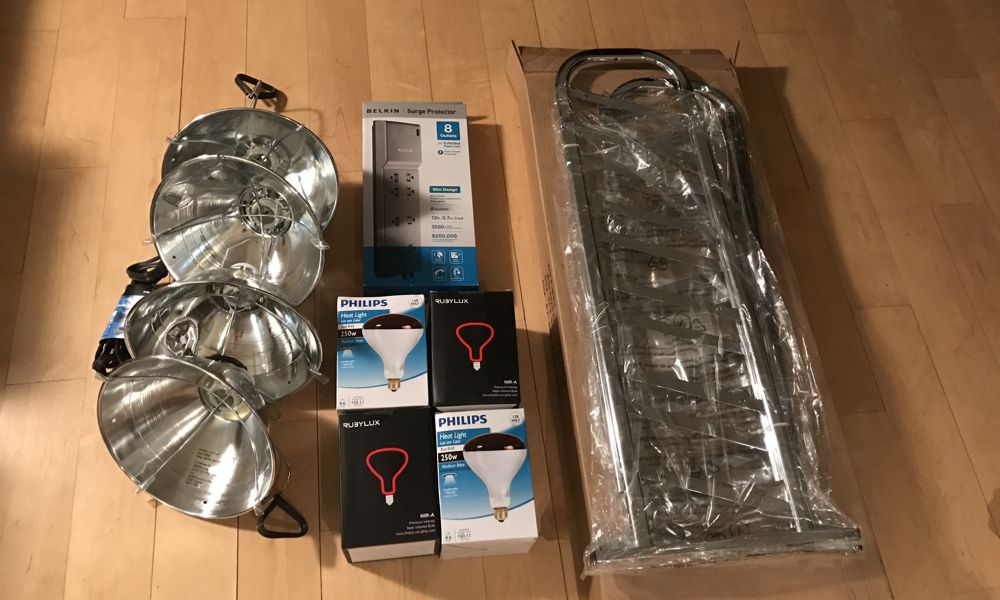
Setting up your own DIY sauna is surprisingly easy, and only requires a few parts (scroll down for links):
- Infrared Lights: For obvious reasons, these most important components of any near infrared sauna setup. I prefer RubyLux lights as they have a peak wavelength at 850nm, but TheraBulb is another brand that makes decent bulbs. If you want highest-quality bulbs (and are ok spending some additional $$), I highly recommend SaunaSpace’s new ThermaLight bulbs that claim to deliver 2-4x more red and near infrared radiance. Otherwise, you can save a bit of money by opting to go with Philips NIR bulbs (which have a slightly higher peak wavelength). For my original setup, I went with 2 RubyLux and 2 Philips bulbs then later upgraded by swapping in a few ThermaLight bulbs.
- Lamp Clams: You’ll need heavy-duty light sockets that can handle both the power and the temperature of the bulbs. You must make sure to get ones rates for 250w bulbs, and have ceramic sockets. I went with “brooder” clamp lamps, which are commonly used for raising chickens.
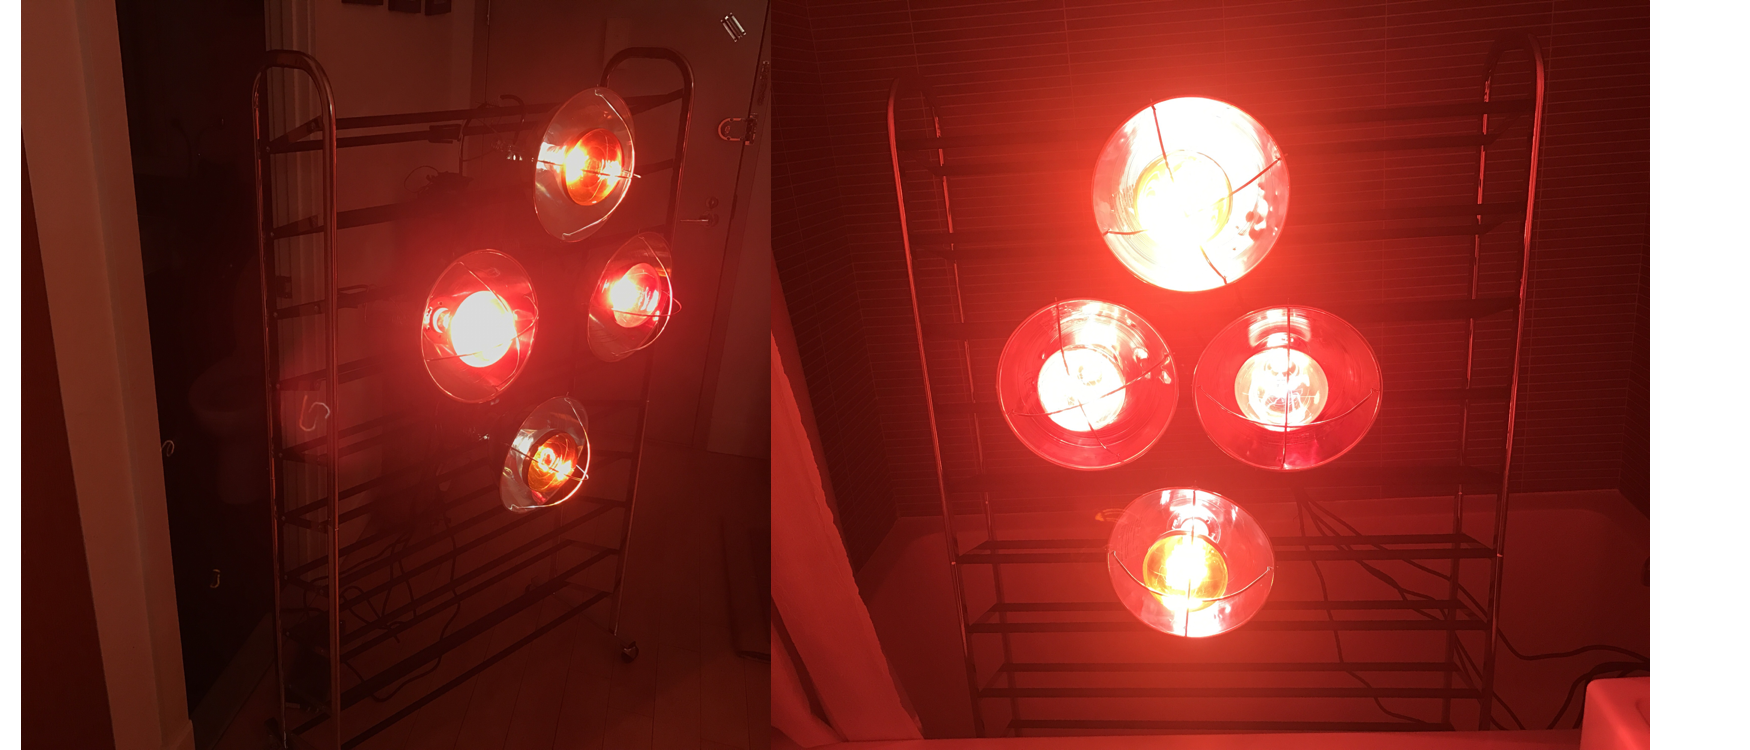
- Stand: The lights must then be clamped to a sturdy object that can support them. I went with a free-standing shoe rack, which is lightweight and sturdy, and has wheels so can be easily moved around. The different racks also allow me to easily reposition/reconfigure the lamps if needed (I arranged the lamps in a “diamond” shape, but they could also be arranged as a square). I also used the twist ties that came with the lamp clamps to better secure them to the stand. If you are feeling handy, you could forego the shoe rack and construct your own wood stand, with holes drilled out for the light sockets (just be sure to use all-natural lumber and nothing coated in chemicals!).
- Power Strip: All of the lights then plug into a heavy-duty power strip with surge protector, which can handle the load of the bulbs. I went with one having a longer, 12-foot cord for convenience.
- Canopy: (optional) This is completely optional, but you are planning on using your sauna in a large/open room, you may want to consider setting up a canopy to help trap in the heat. Some large thermal curtains could certainly work. I didn’t use one, as I use my sauna is in a small bathroom that heats up pretty easily (and has warming fan in the ceiling), and allows me to get a good sweat on!
- Eye Protection: While NIR light isn’t inherently dangerous if you happen look look at one for a few seconds, you may want to invest in an inexpensive pair of tanning bed-style goggles. The lamps are extremely bright, so definitely try to avoid staring directly at them.
My DIY Infrared Sauna – Putting It All Together
Here is a shopping list containing all of the components I purchased to construct my DIY sauna for under $150. If you go with 4 of the less-expensive Philips bulbs and have a decent power strip lying around, you can build one for under $100!*
Bulbs:
My setup uses four bulbs – I’ve provided several decent options based on your budget :
- SaunaSpace ThermaLight Infrared Incandescent Bulbs ($$$) – these are the best bulbs I’ve found (I ended upgrading my setup by adding a few, but you can save some money by going with):
- RubyLux Infrared Bulb NIR-A Near Infrared Individual Bulbs ($$) (these tend to sell out, so another option is):
- 250-Watt TheraBulb NIR-A Near Infrared Bulbs ($$) (or go with the most “affordable” setup by using):
- Philips 415836 Heat Lamp 250-Watt R40 Flood Light Bulbs ($)
Materials:
- Lamp Clamps: (4) Woods 0166 18/2 SJTW Brooder Clamp Lamp w/ Bulb Guard & 10-Inch Reflector, 300-Watt, 6-Foot Cord (one per bulb)
- Power Strip: (1) Belkin 8-Outlet Home and Office Power Strip Surge Protector with 12-Foot Power Cord and Phone / Coaxial Protection, 3390 Joules
- Stand: (1) AmazonBasics 50-Pair Shoe Rack (some people have found or built other stands to connect the lamps to)
- Protection: (1) Tanning Bed Goggles (recommended)
Happy Sauna-ing! If you end up building your own DIY infrared sauna, let me know and I will share photos here and on Instagram!
Oh, and if you are looking for a nicer solution, these are my favorite IR sauna manufacturers:


 Using Lumen Metabolism Tracker")